

Building a Local Development Environment with PySpark, Jupyter, Kafka, Docker and PyCharm
How to interact with Spark and Kafka clusters running as Docker containers using Dockerized Jupyter Notebooks with PyCharm


Table of contents
Introduction
This guide will walk you through the process of setting up a local development environment using PyCharm, Docker, PySpark, Jupyter Notebooks, and Kafka. It will cover the necessary prerequisites, the end goal, project setup, and execution.
You will learn basic reading and writing data with PySpark, run Python scripts on Spark, and consume Kafka streams from PySpark, all within Jupyter Notebooks and PyCharm.
The article describes how Docker can simplify your workflow by creating a containerized environment. This setup enables you to experiment with PySpark and Kafka without installing all dependencies on your local machine. PyCharm can seamlessly work with this Dockerized environment, allowing you to recreate the same setup on different machines easily. By isolating dependencies within containers, Docker also helps prevent issues caused by version clashes. For example, if you're working on multiple projects that depend on different versions of the Java Runtime, without isolation, you would have to uninstall and reinstall various versions of the Java Runtime constantly.
This guide assumes you have some familiarity and exposure with Docker, Kafka, PySpark, Jupyter Notebooks and PyCharm but would like these to work together on your local development machine for experimentation.
Prerequisites
Goal
The goal is to have a Dockerized environment running on your machine that looks something like the diagram below:
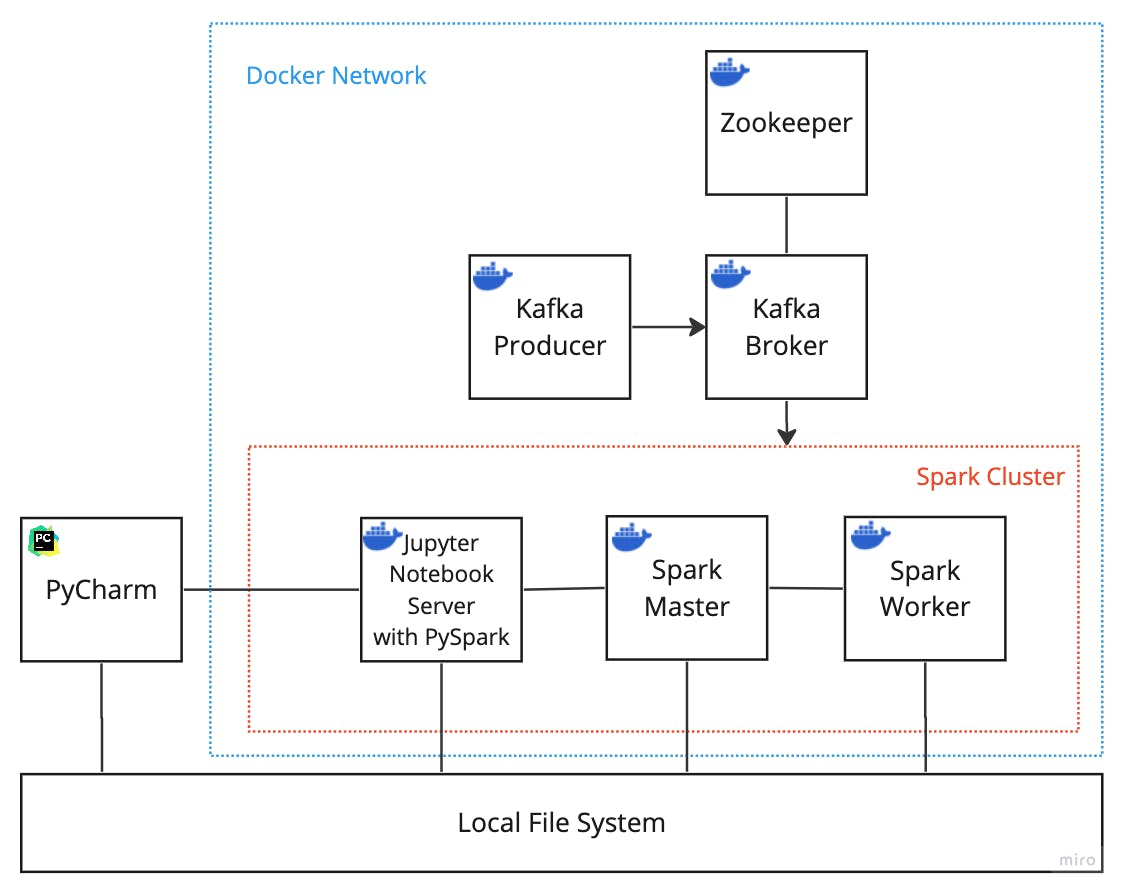
Let's go from left to right and break down the diagram.
For starters, we have PyCharm, the IDE, which has access to the local file system where your notebooks and other files will live when edited within PyCharm.
PyCharm is connected to the Jupyter Notebook Server in a docker container with access to the local filesystem. We want Jupyter and PyCharm to access the local directory where the notebooks are, edit them in PyCharm and execute them within the Jupyter Notebook Server. Additionally, PySpark is installed on the Jupyter Notebook Server for PySpark execution within the Spark cluster.
Then, we have the Spark Cluster nodes, which consist of a master node and a worker node. Many worker nodes can be connected to a master, and we can use the docker-compose arg --scale to increase the number of spark workers if required. A spark cluster manager can be configured in many ways, such as with Kubernetes or Hadoop YARN; however, for this guide, we will use standalone mode where the master node is the spark master and the cluster manager. The Spark cluster nodes and the Jupyter Server have access to the local file system. This setup will mount the same data directory to all Spark nodes. All Spark nodes within a cluster must have access to all files; as Spark is a distributed data processing framework, all files and file partitions must be accessible to all nodes. Spark abstracts away how it selects file partitions.
Then, we have the Kafka containers. So, we have the Kafka Broker, a docker container running Kafka as a single broker cluster; this is what publishers would publish messages to and what consumers would subscribe to. We have the Kafka Producer, a Python application that publishes messages to a Kafka topic on the Kafka Broker container. Kafka requires the Zookeeper container to maintain configuration.
Finally, because docker spins everything up, the containers exist within the private network created by docker, allowing the containers to find each other by their defined service name and any ports they may be listening on.
Project Setup
This guide section will explain the necessary folder structure and files to achieve the goal, including detailed explanations of key files and configurations.
Directory Structure
/.idea/
/data/
    cereal.csv
    museums.csv
    ufo.csv
/docker/
    /jupyter-pyspark/
        Dockerfile
    /kafka-producer/
        Dockerfile
        main.py
        Pipfile
        Pipfile.lock
/notebooks/
    /examples/
        kafka-consumer.ipynb
        reading-files.ipynb
        writing-files.ipynb
/pyscripts/
    example_submit.py
.gitignore
LICENSE
README.md
docker-compose.yaml
spark.conf
The complete example can be found in the GitHub Repo.
Least Interesting Files & Folders
Let's break down some of the least interesting files.
The LICENSE file contains the license for the code; tldr; do what you want with the code.
The .gitignore file tells git what files and folders to ignore when committing code to git.
The README.md file contains a brief description of the code.
The spark.conf file has the configuration for Spark, which can be mounted into the configuration directory on the Spark nodes. A configuration such as logging level or which port to expose the UI can be configured here.
The .idea folder is a folder created by PyCharm that holds IDE project configuration; it will be pretty unique from person to person. This will have some critical bits for connecting to a Jupyter Server instance running in a docker container instead of a temporary one spun up by PyCharm for Jupyter Notebook projects. Having this folder will mean you can skip the step in this guide about connecting your PyCharm to Jupyter Notebooks running in a docker container.
Data, Python and Notebooks
The /data/ folder contains CSV files that we can use in Spark to perform experiments. I suggest this folder as the ideal location to store all the data you intend to interact with. The folder will be mounted to the Spark nodes for easy access.
The /pyscripts/ contains Python scripts accessible within the Jupyter Notebook container. Any Python scripts that you want to submit to Spark should live in this folder.
The /notebooks/ folder contains some example Jupyter Notebooks, such as reading-files.ipynb which is an example of using PySpark to read from a file within the /data/ directory and kafka-consumer.ipynb which is an example of consuming events from a Kafka topic. This is where all of the Jupyter Notebooks should live.
Docker
Getting more interesting, the /docker/ folder contains the elements required to create a Kafka Producer application and a Jupyter Notebook Server with PySpark installed.
Kafka Producer
The /docker/kafka-producer/ directory contains a Python application that produces random events using the Python package fake_web_events and then publishes them to a Kafka topic; the application is built as a docker image. The Python application uses pipenva Python virtual environment and package management tool; the /docker/kafka-producer/Pipfile.lock file is used by pipenv to recreate the package dependencies within the docker image. The application also uses the Python package confluent-kafka to connect and publish to Kafka. The packages and pipenv configuration can be seen here in the /docker/kafka-producer/Pipfile file:
[[source]]
url = "https://pypi.org/simple"
verify_ssl = true
name = "pypi"

[packages]
fake-web-events = "*"
confluent-kafka = "*"

[dev-packages]

[requires]
python_version = "3.11"
The main application code is located in the aptly named, main.py, here:
from confluent_kafka import Producer
from fake_web_events import Simulation
import socket
import os
import json

SIMULATION_TIME_SECONDS = int(float(os.environ.get("SIMULATION_TIME_SECONDS", 60)))
USER_POOL_SIZE = int(float(os.environ.get("USER_POOL_SIZE", 100)))
SESSIONS_PER_DAY = int(float(os.environ.get("SESSIONS_PER_DAY", 100000)))
KAFKA_HOST = os.environ.get("KAFKA_HOST", 'host1:9092,host2:9092')
KAFKA_TOPIC = os.environ.get("KAFKA_TOPIC", 'mytopic')

def createKafkaProducer():
    conf = {'bootstrap.servers': KAFKA_HOST,
            'client.id': socket.gethostname()}

    producer = Producer(conf)
    return producer

def acked(err, msg):
    if err is not None:
        print("Failed to deliver message: %s: %s" % (str(msg), str(err)))
    else:
        print("Message produced: %s" % (str(msg.value())))
def runSimulation():
    simulation = Simulation(user_pool_size=USER_POOL_SIZE, sessions_per_day=SESSIONS_PER_DAY)
    events = simulation.run(duration_seconds=SIMULATION_TIME_SECONDS)
    producer = createKafkaProducer()
    for event in events:
        payload = json.dumps(event)
        producer.produce(KAFKA_TOPIC, key="key", value=payload, callback=acked)
        producer.poll(0)

if __name__ == '__main__':
    runSimulation()
main.py takes various configuration options from environment variables, such as the Kafka Host and Kafka Topic.
The final piece of the /docker/kafka-producer/ directory is the Dockerfile:
FROM docker.io/python:3.11-slim-bullseye as base
# Setup env
ENV LANG C.UTF-8
ENV LC_ALL C.UTF-8
ENV PYTHONDONTWRITEBYTECODE 1
ENV PYTHONFAULTHANDLER 1


FROM base AS python-deps

# Install pipenv and compilation dependencies
RUN pip install pipenv
RUN apt-get update && apt-get install -y --no-install-recommends gcc

# Install python dependencies in /.venv
COPY Pipfile .
COPY Pipfile.lock .
RUN PIPENV_VENV_IN_PROJECT=1 pipenv install --deploy

FROM base AS runtime

# Copy virtual env from python-deps stage
COPY --from=python-deps /.venv /.venv
ENV PATH="/.venv/bin:$PATH"

# Create and switch to a new user
RUN useradd --create-home appuser
WORKDIR /home/appuser
USER appuser

# Install application into container
COPY main.py .

# Run the application
CMD ["python", "main.py"]
The /docker/kafka-producer/Dockerfile uses the docker builder pattern to build up a Python image, install pipenv, copy over files, install the packages and prepare the image to run the application when a container is created from the image.
Jupyter with PySpark
The /docker/jupyter-pyspark/ folder contains the following Dockerfile to create an image with Jupyter Notebooks and PySpark:
FROM docker.io/jupyter/pyspark-notebook:x86_64-spark-3.5.0

# Install in the default python3 environment
RUN pip install --no-cache-dir 'pytest' && \
    fix-permissions "${CONDA_DIR}" && \
    fix-permissions "/home/${NB_USER}"
It's a simple Dockerfile with a base image and a single command to install the Python package 'pytest'. Jupyter maintains a docker image with Jupyter Notebooks and PySpark; however, according to Jupyter PySpark Image FAQs, the recommended method for installing packages is to install them at build time in an inherited image, as we have done here.
Docker Compose
The file that ties it all together, docker-compose.yaml
# https://jupyter-docker-stacks.readthedocs.io/en/latest/
# https://hub.docker.com/r/bitnami/spark/
services:
  jupyter-pyspark-notebook:
    build: ./docker/jupyter-pyspark
    depends_on:
      - spark-master
    environment:
      NOTEBOOK_ARGS: --NotebookApp.token=''
    ports:
      - '8888:8888'
      - '4040-4060:4040-4060'
    volumes:
      - ./data:/opt/workspace
      - ./notebooks:/home/jovyan/work/notebooks
      - ./pyscripts:/home/jovyan/work/pyscripts
      - ./spark.conf:/opt/bitnami/spark/conf/spark-defaults.conf
  spark-master:
    image: docker.io/bitnami/spark:3.5.0
    environment:
      - SPARK_MODE=master
      - SPARK_RPC_AUTHENTICATION_ENABLED=no
      - SPARK_RPC_ENCRYPTION_ENABLED=no
      - SPARK_LOCAL_STORAGE_ENCRYPTION_ENABLED=no
      - SPARK_SSL_ENABLED=no
      - SPARK_USER=spark
    ports:
      - '8080:8080'
      - '7077:7077'
    volumes:
      - ./data:/opt/workspace
      - ./spark.conf:/opt/bitnami/spark/conf/spark-defaults.conf
  spark-worker:
    image: docker.io/bitnami/spark:3.5.0
    depends_on:
      - spark-master
    environment:
      - SPARK_MODE=worker
      - SPARK_MASTER_URL=spark://spark-master:7077
      - SPARK_WORKER_MEMORY=1G
      - SPARK_WORKER_CORES=1
      - SPARK_RPC_AUTHENTICATION_ENABLED=no
      - SPARK_RPC_ENCRYPTION_ENABLED=no
      - SPARK_LOCAL_STORAGE_ENCRYPTION_ENABLED=no
      - SPARK_SSL_ENABLED=no
      - SPARK_USER=spark
    volumes:
      - ./data:/opt/workspace
      - ./spark.conf:/opt/bitnami/spark/conf/spark-defaults.conf
  kafka-producer:
    build: ./docker/kafka-producer
    depends_on:
      - kafka-broker
    environment:
      - KAFKA_HOST=kafka-broker:29092
      - KAFKA_TOPIC=web-events
      - SIMULATION_TIME_SECONDS=86400
      - USER_POOL_SIZE=100
      - SESSIONS_PER_DAY=100000
  zookeeper:
    image: docker.io/confluentinc/cp-zookeeper:7.4.3
    environment:
      ZOOKEEPER_CLIENT_PORT: 2181
      ZOOKEEPER_TICK_TIME: 2000
  kafka-broker:
    image: docker.io/confluentinc/cp-kafka:7.4.3
    depends_on:
      - zookeeper
    ports:
      - 9092:9092
    environment:
      KAFKA_BROKER_ID: 1
      KAFKA_ZOOKEEPER_CONNECT: zookeeper:2181
      KAFKA_ADVERTISED_LISTENERS: PLAINTEXT://kafka-broker:29092,PLAINTEXT_HOST://localhost:9092
      KAFKA_LISTENER_SECURITY_PROTOCOL_MAP: PLAINTEXT:PLAINTEXT,PLAINTEXT_HOST:PLAINTEXT
      KAFKA_INTER_BROKER_LISTENER_NAME: PLAINTEXT
      KAFKA_OFFSETS_TOPIC_REPLICATION_FACTOR: 1
The docker-compose.yaml defines the services, mounts the directories, sets the environment variables and maps the ports. Spinning up this docker-compose achieves everything outlined in the goal section earlier in this guide, apart from PyCharm.
The volumes: mapping ./data:/opt/workspace appears in all of the services with PySpark. This allows containers running PySpark access to any file within the /opt/workspacedirectory, which is mapped to the local directory ./data. So, if we wanted to read the file ./data/ufo.csv using PySpark, we would use the path /opt/workspace/ufo.csv in code, and regardless of which Spark node was executing the code, it would just work.
The volumes: mapping ./notebooks:/home/jovyan/work/notebooks allows Jupyter Notebook files to be executable within the Jupyter Notebook Server docker container. Who is jovyan? It's just some humour injected in by the maintainer of the Jupyter PySpark image; the background on the name can be found here.
I've added the volumes: mapping ./pyscripts:/home/jovyan/work/pyscripts to make a folder accessible within the Jupyter Notebook container so we can submit Python scripts to Spark.
The next interesting piece of configuration are the Kafka advertised listeners and the port mappings for the Kafka broker. The kafka-broker service has this environment variable: KAFKA_ADVERTISED_LISTENERS: PLAINTEXT://kafka-broker:29092,PLAINTEXT_HOST://localhost:9092. The Kafka broker is listening on two ports, 2902 and 9092. Everything inside the docker network can access the broker using the service name and port 2092, which is why the kafka-producer service has this environment variable KAFKA_HOST=kafka-broker:29092. The kafka-broker service maps port 9092 to the host, this allows everything outside of the docker network, such as any tools within PyCharm or anything else on your development machine, to access the broker using localhost:9092 because of the PLAINTEXT_HOST://localhost:9092 in KAFKA_ADVERTISED_LISTENERS and the 9092:9092 docker port mapping, but everything inside the docker network, such as the kafka-producer and Jupyter Notebooks can access the broker using kafka-broker:29092 because of the PLAINTEXT://kafka-broker:29092 in KAFKA_ADVERTISED_LISTENERS and that the Kafka broker service is called kafka-broker. This confluent blog post does a good job of explaining Kafka listeners.
The zookeeper service has the environment variable ZOOKEEPER_CLIENT_PORT: 2181 which tells zookeeper to listen on port 2181, and the kafka-broker service has the environment variable KAFKA_ZOOKEEPER_CONNECT: zookeeper:2181 which is what allows the Kafka broker to find and connect to zookeeper within the docker network.
Both the spark-master and spark-worker services use the bitnami/spark:3.5.0 docker image, maintained by bitnami; an image that can be started in either worker or master mode. The master maps port 7077 to the host, which allows us to access the master via monitoring tools in PyCharm and also maps port 8080 to the host, which enables us to access the spark master web UI from the browser using localhost:8080. The spark worker service can connect to the master because of the environment variable SPARK_MASTER_URL=spark://spark-master:7077, because the service is called "spark-master", and the master service listens on port 7077 for workers, the worker can find it within the docker network and connect to it.
The port mappings and environment variables on the jupyter-pyspark-notebook service is quite interesting. Port 8888 is mapped to the host, allowing us to access the web UI for the Jupyter Notebook server from our browser using localhost:8888, but it also will enable PyCharm to connect to Jupyter. When the Jupyter Notebook server spins up, it writes an access token out to the console, which must be passed in as a query string to the Jupyter URL to access it; it's a new token every time the container spins up; this is unnecessary when we are running this locally on a development machine so the environment variable NOTEBOOK_ARGS: --NotebookApp.token='' starts Jupyter without any access token requirement. The other port mapping is for the port range 4040:4060, so we can access the Spark Application UI from our browser. Since we will mainly be executing Spark from Jupyter Notebooks, the Spark application will run from the Jupyter container, which is what will expose and listen on port 4040; I've added a range in the instance you have multiple notebooks running, in which case the port number is incremented per application; so application one will be port 4040, application two will be 4041, etc.
PyCharm
If you're familiar with PyCharm, you know it has good support for Jupyter Notebooks. PyCharm will spin up a Jupyter Notebook Server somewhere and uses whatever Python virtual environment you set up at the project start, and whatever packages you have installed are available.
However, you probably came here because you want to use Jupyter Notebook with PyCharm but don't want to install PySpark, Scala, the JVM, or whatever else is required on your local machine. You want a dockerized environment and want PyCharm to treat a docker container with all of the dependencies contained within it as if it were running wherever PyCharm usually gets its dependencies from.
This is the part of the guide that will help you achieve that. Now that we have the docker setup and folder structure, this guide will take you from Zero to the finish line with PyCharm. You can skip this part entirely and clone this working repo.
Create a brand new "Pure Python" Project with the default "Project venv" in PyCharm
Delete the
.venvdirectoryCopy the folders and files from the GitHub repo (excluding the
.ideafolder)Go to Settings -> Build, Execution, Deployment -> Docker and create a new Docker server. Use Unix socket. "Successfully connected" should appear.
Configure Docker Compose as a remote PyCharm interpreter as per documentation. In the service dropdown, select
jupyter-pyspark-notebook.In the Project panel, right-click on
docker-compose.yamland run it.Open a Jupyter Notebook from
/notebooks/examples/, do not execute anything. Configure the Jupyter Server as per documentation. DO NOT use the Managed Server option. Set the configured server to http://127.0.0.1:8888Run a Jupyter Notebook cell in any of the files in
/notebooks/examples/.
Remember, to run the docker-compose.yaml file whenever you reopen the project in the future to reconnect to Jupyter. You may get a popup asking for a token, click cancel or OK a few times, and this will only happen when you reopen the project the first time.
Executing
Now that your local development environment is all setup, let's start running some PySpark and explore what's available.
If you haven't done so already, run the docker-compose file by right-clicking docker-compose.yaml and clicking "Run".
Submitting Python Scripts
Let's start by connecting to the jupyter-pyspark-notebook service's running container.
Open Docker Desktop and click on containers:
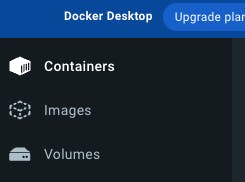
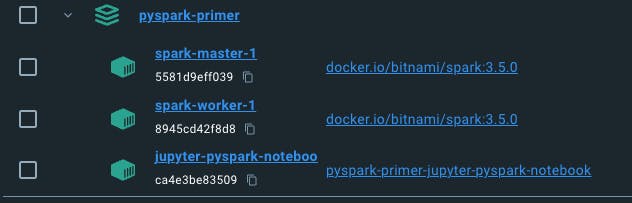
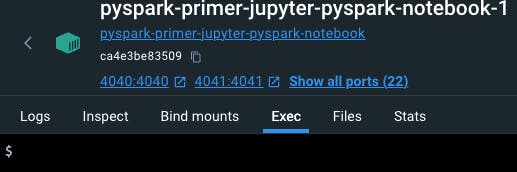
Then expand the service stack for whatever your project is called; in my instance, it's called pyspark-primer. You'll see the running containers listed underneath; click on the jupyter-pyspark-notebook container:
Click on the exec tab to open a terminal in the jupyter-pyspark-notebook container:
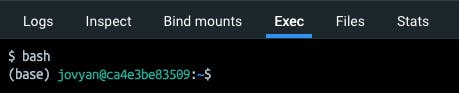
Then type bash and hit enter to switch to the bash terminal inside the container:
Now, let's have a look at what's in the /pyscripts folder.
ls ~/work/pyscripts
You should see example_submit.py.

Now, let's submit example_submit.py to Spark using the spark-submit command:
spark-submit ~/work/pyscripts/example_submit.py
You should see a result like this:
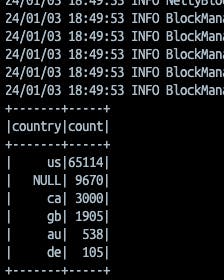
You've successfully connected to the Jupyter PySpark container and submitted a Python script to Spark 🚀
Reading Data with Jupyter and PySpark
For this, we'll go into PyCharm and open up the example Jupyter Notebook called /notebooks/examples/reading-files.ipynb and run the cells.
Make sure docker-compose.yaml is running, and the notebook is connected to the containerised Jupyter.
Execute the first cell to create a Spark session:
from pyspark.sql import SparkSession
import os

spark = (
    SparkSession
    .builder
    .master("spark://spark-master:7077")
    .getOrCreate()
)
And then execute the second cell to read the file ufo.csv from the /data directory:
df = spark.read.csv(
    path=os.path.join("/opt/workspace", "ufo.csv"),
    header=True,
    inferSchema=True
)

df.printSchema()
The data frame schema should be printed out to the notebook like this:
root
 |-- datetime: string (nullable = true)
 |-- city: string (nullable = true)
 |-- state: string (nullable = true)
 |-- country: string (nullable = true)
 |-- shape: string (nullable = true)
 |-- duration (seconds): string (nullable = true)
 |-- duration (hours/min): string (nullable = true)
 |-- comments: string (nullable = true)
 |-- date posted: string (nullable = true)
 |-- latitude: string (nullable = true)
 |-- longitude : double (nullable = true)
This confirms that the csv was read correctly and the PySpark data frame interpreted the schema.
Execute the next cell to show the first five rows of the csv:
df.show(5)
You should see a table like this:
| datetime | city | state | country | shape | duration (seconds) | duration (hours/min) | comments | date posted | latitude | longitude |
| 10/10/1949 20:30 | san marcos | tx | us | cylinder | 2700 | 45 minutes | This event took p... | 4/27/2004 | 29.8830556 | -97.9411111 |
| 10/10/1949 21:00 | lackland afb | tx | NULL | light | 7200 | 1-2 hrs | 1949 Lackland AFB... | 12/16/2005 | 29.38421 | -98.581082 |
| 10/10/1955 17:00 | chester (uk/england) | NULL | gb | circle | 20 | 20 seconds | Green/Orange circ... | 1/21/2008 | 53.2 | -2.916667 |
| 10/10/1956 21:00 | edna | tx | us | circle | 20 | 1/2 hour | My older brother ... | 1/17/2004 | 28.9783333 | -96.6458333 |
| 10/10/1960 20:00 | kaneohe | hi | us | light | 900 | 15 minutes | AS a Marine 1st L... | 1/22/2004 | 21.4180556 | -157.8036111 |
And finally, stop the Spark program by executing this last cell:
spark.stop()
You've successfully executed a Jupyter Notebook running PySpark within a containerised environment from PyCharm to read data from a local directory 🚀
Writing Data with Jupyter and PySpark
Again, we'll continue using PyCharm, but this time, we'll open up the example Jupyter Notebook called /notebooks/examples/writing-files.ipynb and run the cells.
Make sure docker-compose.yaml is running, and the notebook is connected to the containerised Jupyter; it isn't already.
Execute the first cell to create a Spark session:
from pyspark.sql import SparkSession
import os

spark = (
    SparkSession
    .builder
    .master("spark://spark-master:7077")
    .getOrCreate()
)
And then execute the second cell to create a data frame and print the schema:
columns = ['name', 'type']
data = [('Apple', 'Fruit'), ('Banana', 'Fruit'), ('Carrot', 'Vegetable'), ('Potato', 'Vegetable')]
df = spark.createDataFrame(data=data, schema=columns)
df.printSchema()
You should see the schema printed out like this:
root
 |-- name: string (nullable = true)
 |-- type: string (nullable = true)
Then run the next cell to show the data frame as a table:
df.show()
Which should display a table like this:
| name | type |
| Apple | Fruit |
| Banana | Fruit |
| Carrot | Vegetable |
| Potato | Vegetable |
And then execute the next cell to write the data frame to a csv file:
(
    df
    .coalesce(1)
    .write.csv(
        os.path.join("/opt/workspace", "food.csv"),
        header=True,
        mode="overwrite"
    )
)
This will create a new directory within the /data directory called food.csv. You may need to right-click the /data directory within PyCharm and click "Reload from Disk" to see the new directory.
There will be several files within the new food.csv directory; however, the file that is named something like part-{00000-*}.csv is the actual content of the data frame:
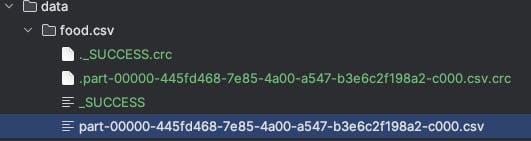
.coalesce(1) forces Spark to use a single partition, resulting in a single output file.And finally, stop the Spark program by executing this last cell:
spark.stop()
You've successfully executed a Jupyter Notebook running PySpark within a containerised environment from PyCharm to write data to a local directory 🚀
Consuming Kafka with Jupyter and PySpark
Using PyCharm, open up the example Jupyter Notebook called /notebooks/examples/kafka-consumer.ipynb, ensuring docker-compose.yaml is running, and the notebook is connected to the containerised Jupyter.
The kafka-producer should be up and running in the background, publishing events to the kafka-broker service, ready for us to consume within the notebook.
Execute the first cell to create a Spark session and load the required Kafka packages:
from pyspark.sql import SparkSession

scala_version = '2.12'
spark_version = '3.5.0'
packages = [
    f'org.apache.spark:spark-sql-kafka-0-10_{scala_version}:{spark_version}',
    'org.apache.kafka:kafka-clients:3.5.0'
]

spark = (
    SparkSession
    .builder
    .master("spark://spark-master:7077")
    .config('spark.jars.packages', ",".join(packages))
    .getOrCreate()
)
To consume from Kafka, PySpark requires some additional packages to be available, which must be available on every Spark node within the cluster. The code .config('spark.jars.packages'... is what imports the relevant packages.
Then execute the next cell to create a data frame from the read stream of the Kafka topic and print the schema:
df = (
    spark
        .readStream
        .format("kafka")
        .option("kafka.bootstrap.servers", "kafka-broker:29092")
        .option("subscribe", "web-events")
        .option("startingOffsets", "earliest")
        .load()
)
df.printSchema()
Which should display something like this:
root
 |-- key: binary (nullable = true)
 |-- value: binary (nullable = true)
 |-- topic: string (nullable = true)
 |-- partition: integer (nullable = true)
 |-- offset: long (nullable = true)
 |-- timestamp: timestamp (nullable = true)
 |-- timestampType: integer (nullable = true)
And then create a write stream from the data frame to print the IDs for the batches of messages consumed from the Kafka topic:
(
    df.selectExpr("CAST(key AS STRING)", "CAST(value AS STRING)")
        .writeStream
        .outputMode("append")
        .foreachBatch(lambda batch_df, batch_id: print(f"batch_id: {batch_id}"))
        .start()
        .awaitTermination(5)
)
Which should print something like this:
batch_id: 0
batch_id: 1
batch_id: 2
batch_id: 3
batch_id: 4
batch_id: 5
batch_id: 6
batch_id: 7
And finally, stop the Spark program by executing this last cell:
spark.stop()
You've successfully executed a Jupyter Notebook running PySpark within a containerised environment from PyCharm to consume data from a Kafka broker 🚀
Exploring the Spark Web UIs
Since all the Web UI ports have been mapped to the host (your local development machine), we can access some of the Web UIs a Spark Cluster exposes.
Before we explore the UIs, let's make some modifications to the docker-compose run configuration.
In PyCharm, if you have the docker-compose.yaml file still up and running, go ahead and spin it down:
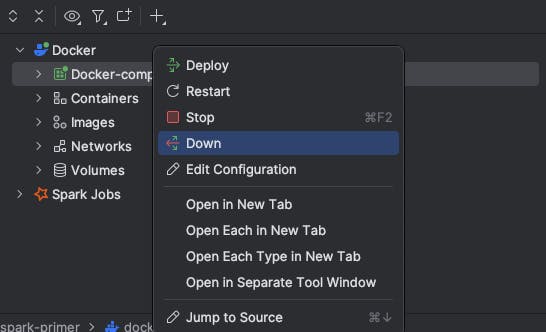
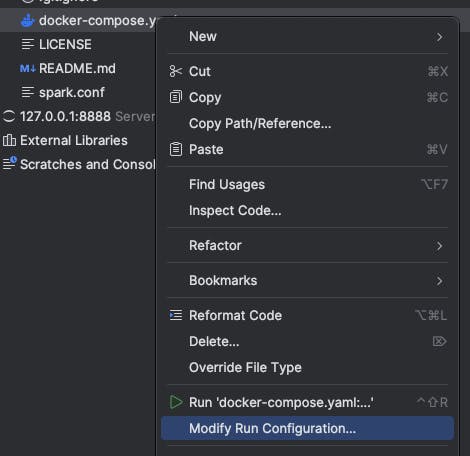
To make the run configuration changes, start by right-clicking on the docker-compose.yaml file and then click on "Modify Run Configuration":
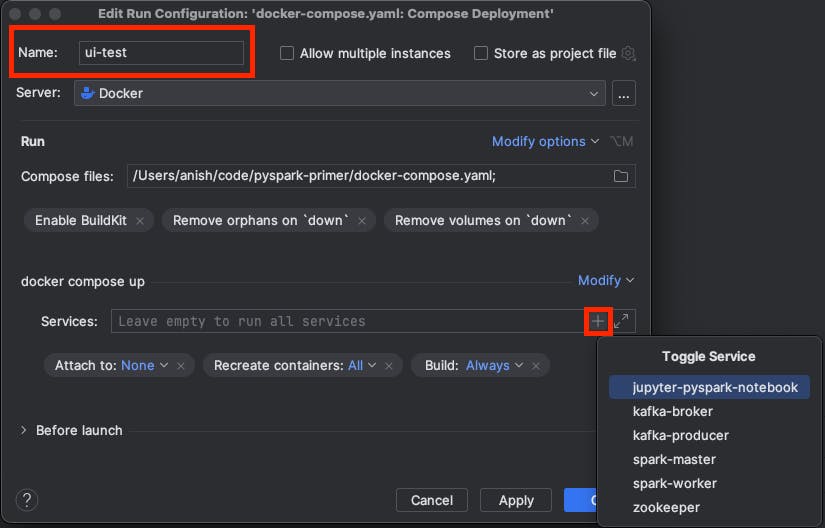
Name the configuration "ui-test" and click on the "+" within the "Services" input box under the "docker compose up" section to bring up the "Toggle Service" dropdown, and select the jupyter-pyspark-notebook, spark-master and spark-worker services:
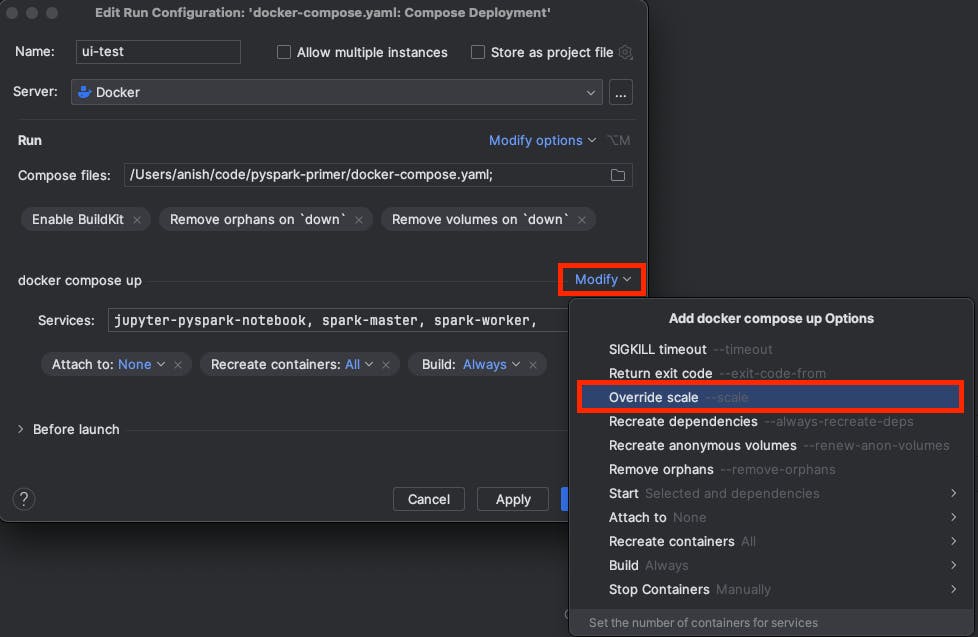
Then click on "Modify" in the "docker compose up" section to bring up the options dropdown and select "Override scale":
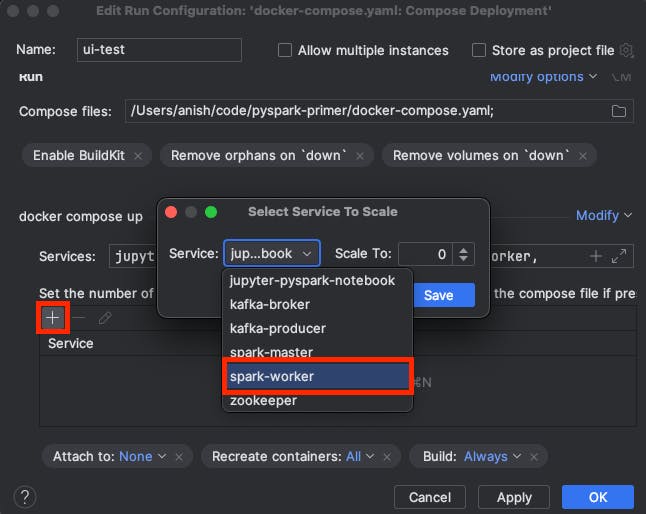
Click the "+" button to select a service to scale, and from the service dropdown select the spark-worker service:
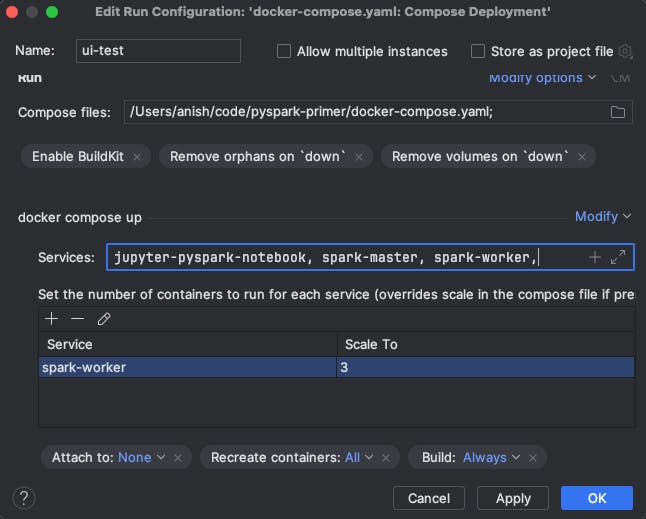
Scale it up to 3 and click save:

The configuration should look like this, click "OK":
The run configuration should now be available for selection in the top right of PyCharm; click the Play button next to "ui-test" to run it:
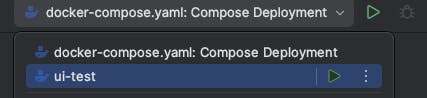
This runs the docker-compose.yaml file, however, it only runs the jupyter-pyspark-notebook, spark-master and spark-worker services and runs three instances of the spark-worker service.
Now, navigate to localhost:8080 in your web browser to view the Spark Master Web UI:
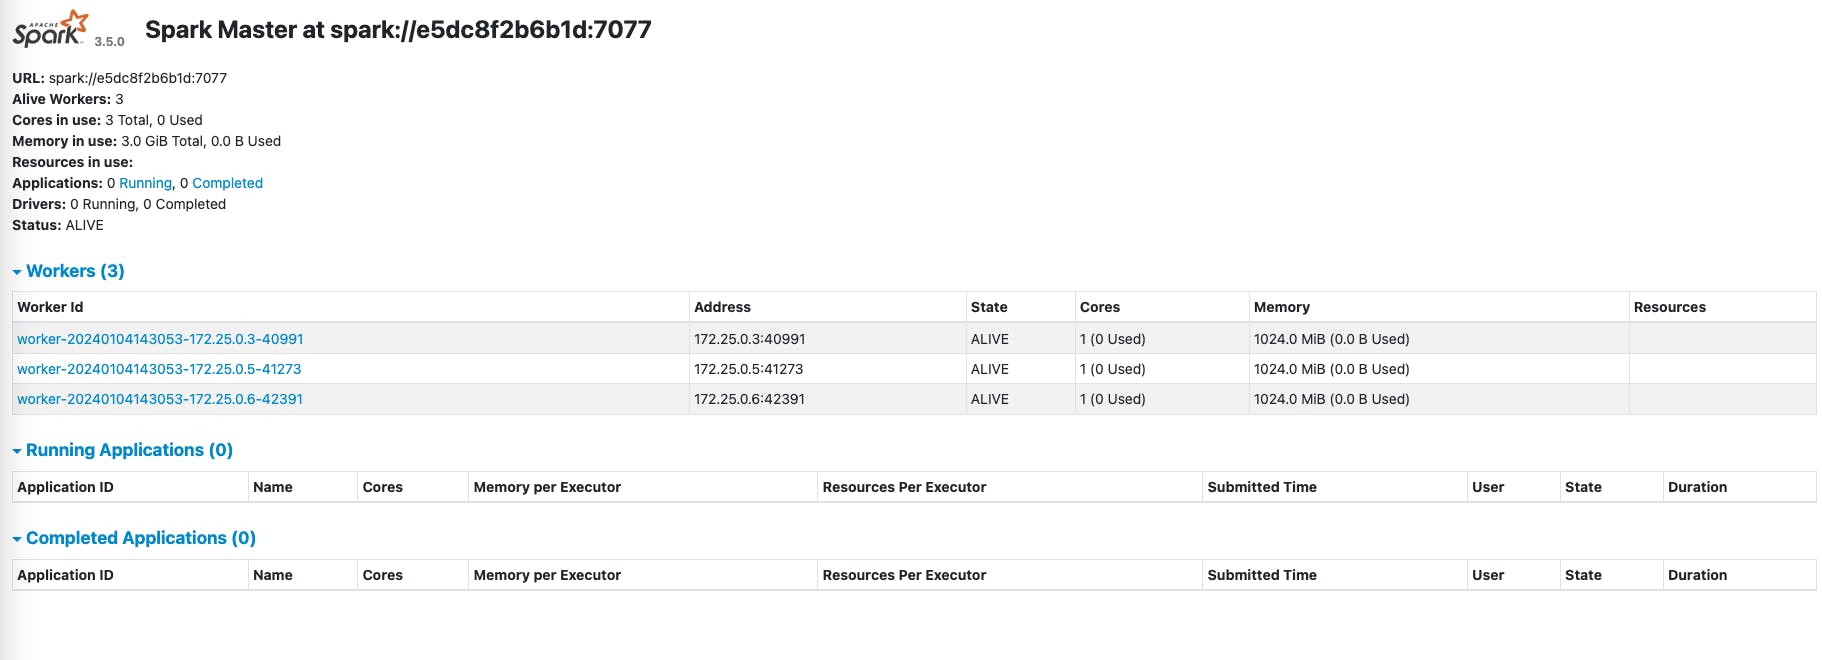
We can see three workers in the Spark cluster 🙌
Now, if you open the /notebooks/examples/reading-files.ipynb notebook in PyCharm execute the first cell and then go back to the Spark Master Web UI, you'll see this:
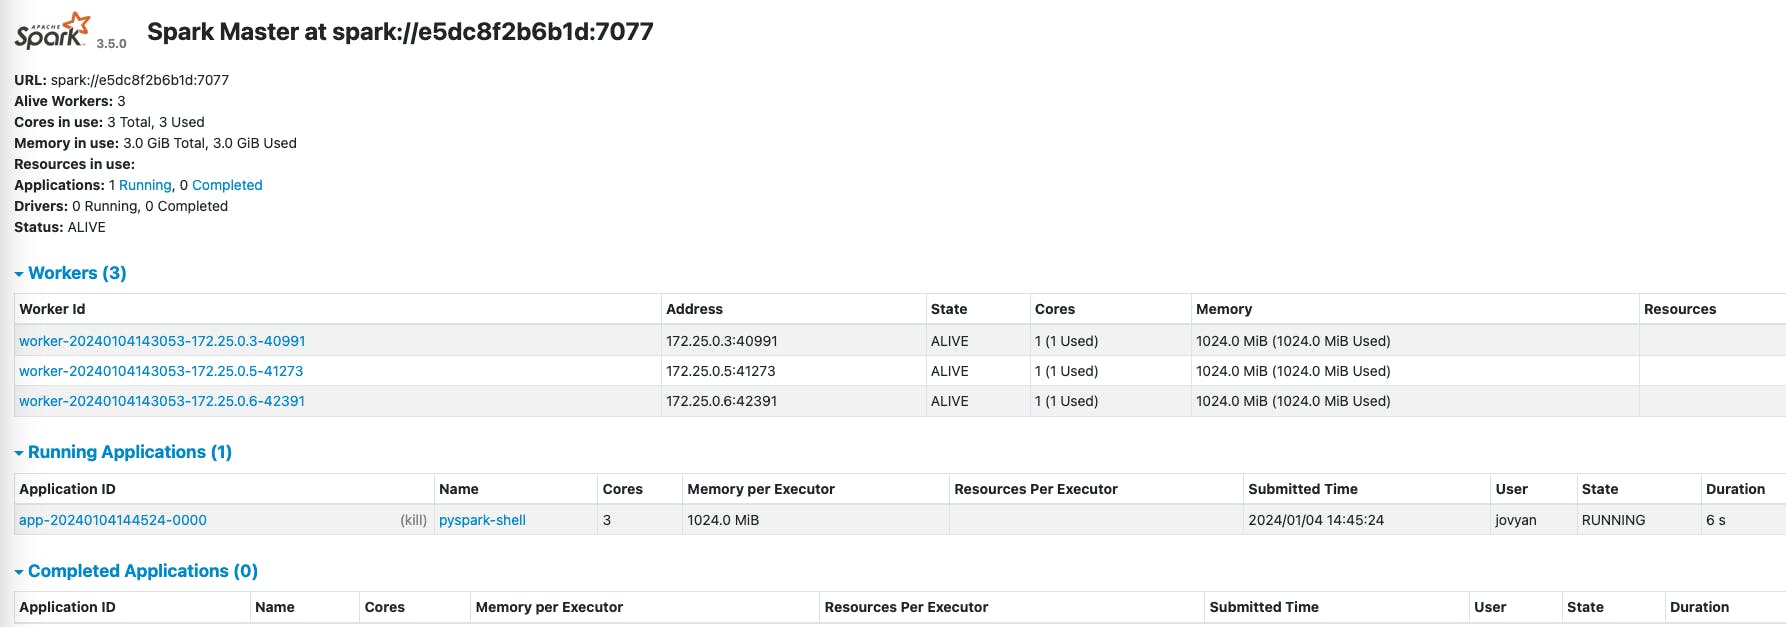
We can see an application is running; this is the Spark Session we created in the Jupyter Notebook.
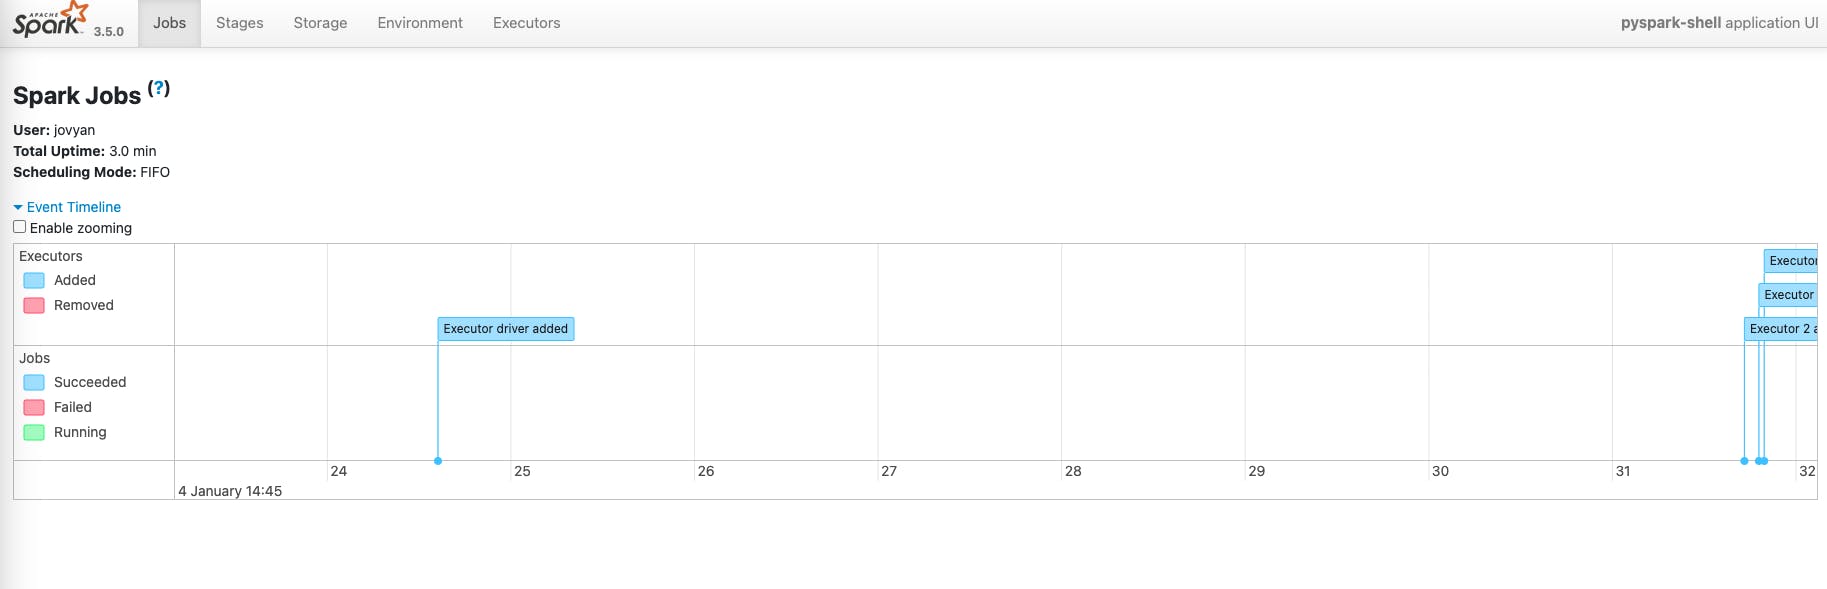
Now that an application is running, we can navigate to the Spark Application UI for it by opening localhost:4040 in a web browser:
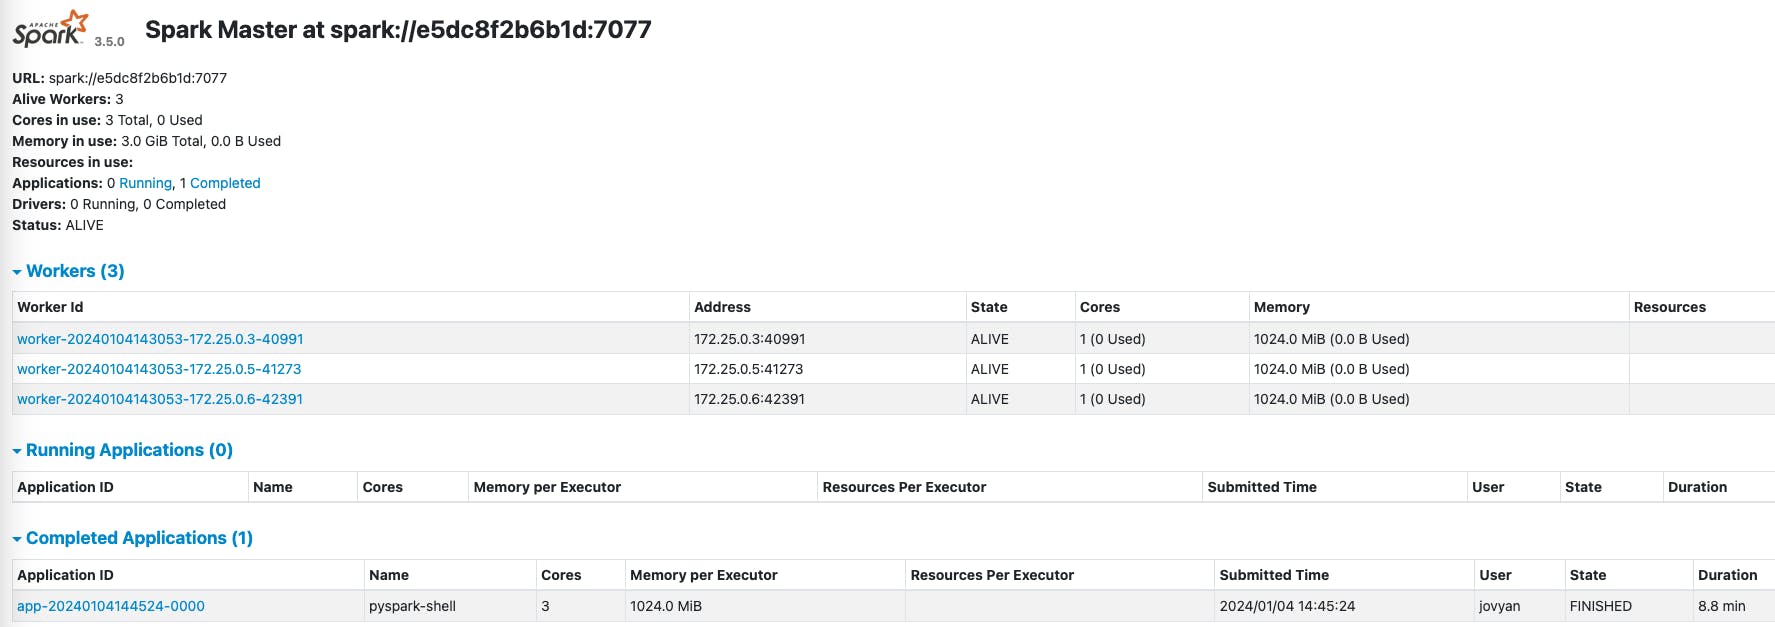
Finally, run the last cell in the Jupyter Notebook to stop the Spark Session and then go back to the Spark Master Web UI to see that the application has been completed:
Summary
In this guide, we have successfully created a local development environment using PyCharm, Docker, PySpark, Jupyter Notebooks, and Kafka. We have learned how to read and write data with PySpark, execute Python scripts on Spark, and consume Kafka streams.
Furthermore, we have explored how Docker can be utilized to establish a simplified, containerized environment and how PyCharm can be configured to operate smoothly with this setup.
This configuration enables us to experiment with PySpark and Kafka without installing all dependencies on our local machine.